DesignIt Tools
- 13 Oct 2021
- 4 Minutes to read
- Print
- DarkLight
- PDF
DesignIt Tools
- Updated on 13 Oct 2021
- 4 Minutes to read
- Print
- DarkLight
- PDF
Article summary
Did you find this summary helpful?
Thank you for your feedback!
Menu and Tool bar

1. Save :
Save often to prevent loss of changes or data.
2. File:
- Preview: Creates a low-resolution PDF showing the contents of the spread.
- Save as template: saves the document in the library so it can be sorted into a category and used.
3. Edit :
- Undo\Redo: Allows you to undo or redo any changes that were done while the spread is open. Once the spread is closed any changes cannot be undone.
- Cut, Copy, Paste: The keyboard commands for these functions also work as well (ctrl-c, ctrl-v, etc…)
4. Layout :
Margins and Columns: Allows you to change the margin areas inside the spread and add or remove column guides for design purposes.
5. View
- Snap to Grid, Guides, Margins and Columns: This option allows any object or text box to "snap" or attach to the different guide lines on the spread to make it easier to line up elements on the spread.
- Show Grid, Margins, Columns, and Guides: Use this option to either hide or show the guidelines and grids on the spread.
6. Undo\Redo :
Allows you to undo or redo any changes that were done while the spread is open. Once the spread is closed any changes cannot be undone.
7. Text Tool:
Use this tool to add text to your spread. Click anywhere on the spread with this tool to create a text box.
8. Frame Tool:
Use this tool to create frames that can be used to add color or place images into.
9. Stroke Tool:
Use this tool to add stroke lines to your spread.
10. Delete Tool:
Use this tool to remove objects on your spread.
11. Zoom:
Use the plus or minus buttons to zoom in and out of a spread or use the drop down to select from different percentages.
Object Selection

1. Object coordinates:
The X and Y coordinates refer to the object location on the spread. These numbers are measured from the upper left corner and manually typed in to ensure the object is in the correct location. The W and H refers to the width and height of the object which can be manually entered to get an exact size.
2. Rotation:
Select the dropdown to manually rotate or type in the rotation amount.
3. Opacity:
This changes the how transparent the object is. This can be used on images, colour boxes, and text.
4. Stroke:
Apply a stroke (or keyline) around an image, object or text box. You can also change the transparency of the stroke that is applied.
5. Shape:
Automatically change the shape of a frame to a box\rectangle, star, triangle or circle.
6. Drop Shadow:
Apply a drop shadow to an image, object or text. You can choose the color, distance and direction of the drop shadow.
7. Alignment tool:
When more than one object is selected on your spread an alignment tool will appear on the menu bar. Use this tool to align the objects selected.
8. Distribution tool:
This tool will allow you to evenly space multiple objects that have been selected.
Text Options

1. Object coordinates:
- The X and Y coordinates refer to the object location on the spread. These numbers are measured from the upper left corner and manually typed in to ensure the object is in the correct location.
- The W and H refers to the width and height of the object which can be manually entered to get an exact size.
2. Rotation:
Select the dropdown to manually rotate or type in the rotation amount.
3. Opacity:
Select the dropdown to control the amount of text color transparency.
4. Stroke Tool:
Use this tool to add stroke lines to your text box.
5. Font Size:
Select the point size of the font selected.
6. Fonts:
This drop down menu shows all the fonts that have been activated in the Settings screen of ConnectMe.
7. Font Color:
Click on this option to open the color swatch selector.
8. Font Style:
Select the Bold, Italic and Underline version for each font.
9. Font Justification:
Select from the different font alignments. (Left, right, Center, and Justified)
10. Lorem Ipsum:
Use this option to create "filler text" in a text box. (for viewing purposes only)
11. Drop Shadow:
Apply a drop shadow to text. You can choose the color, distance and direction of the drop shadow.
Images
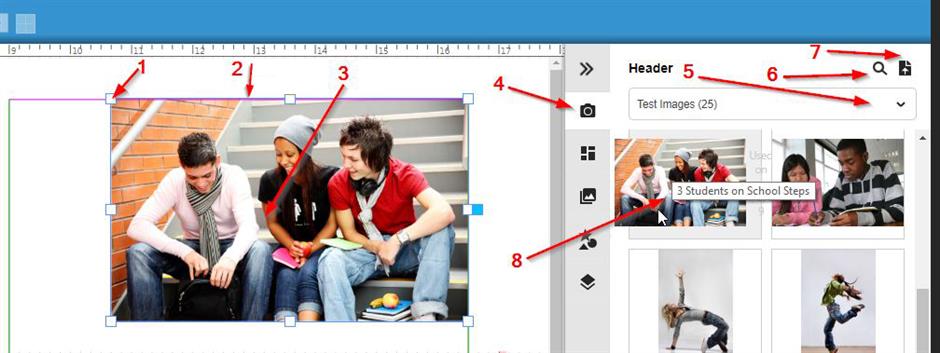
1. Anchor points:
Each object will have 8 anchor points. Click and drag on any of the 8 anchor points to resize the object or box. If the box contains an image it will only be resized proportionally to avoid stretched images.
2. Move Image:
Click and drage anywhere on the image to move it on the spread.
3. Crop tool:
Click anywhere within the image inside of the frame box to resize image within the frame. Double click on the image to switch from the image selection to the frame selection.
4. Image tab:
Click here to access your image library.
5. Image Categories:
Click on this drop down menu to view all the categories that contain images.
6. Image search:
Use this option to find images with specific names or tags that were added when the images were uploaded.
7. Upload images:
This button allows you to upload images.
NOTE:
Only .jpg and .tiff files are supported.
8. Choose and place image:
- Use this option to place images onto the spread. Click and drag the image onto the page, or into a shape object already on spread.
- As images are placed and pages are saved the "Used" indicator shows up on the image thumbnail indicating which pages the image has been used.
- Hovering your mouse over the image will show the name of the image.
Was this article helpful?