Portraits and Portrait flowing
- 25 Mar 2022
- 7 Minutes to read
- Print
- DarkLight
- PDF
Portraits and Portrait flowing
- Updated on 25 Mar 2022
- 7 Minutes to read
- Print
- DarkLight
- PDF
Article summary
Did you find this summary helpful?
Thank you for your feedback!
Portraits and Portrait flowing
1. How do I upload my portraits to Friesens?
You can upload your portrait images in the import screen. Click HERE to watch videos showing how to upload, edit and flow your portrait images.
2.How do we flow into the templates I have already placed.
The online flowing system is not able to flow portraits into portraits boxes that are placed on the spreads. The portrait flowing system creates its own boxes as it flows the images. If you want to flow on templates that you have created, remove the portrait boxes from those templates you have placed and then use the online flowing system to place them in those open spaces.
3. What do you mean “edit” the portraits.
Editing the portraits just means that the images and names are checked to make sure they are correct before they are flown on the pages. Once you flow the images on the pages you won’t be able to edit or change them until you remove the flow. So the best practice is to check them before you flow. Click HERE to watch a video on editing. Click HERE to go to the help page with additional portrait information.
4. How do you separate the portraits for students that have more than one image.
When you click on the student in the edit screen you will see the extra images on the left-hand side. Below each image you will see a separate button. Click on the separate button below the image you want to separate. After you do that it will ask for the first name and last name of the student in that image. Enter the information and click Save. This will create a new entry for this student. Click HERE to watch a video showing how to separate these images.
5. How do I flow my portraits on the pages?
To flow portrait images, you need to first design how you want those portrait images to be placed. Go to the Portraits screen and click on “Design” button beside the grade you want to work on. In that screen you can setup your flow options including font, size, name placement, etc... Once that is all setup go to the top right hand side and enter the pages that you want the portraits to flow on. It will then verify the pages first and then you can click on Flow. Click HERE to watch a video on flowing portraits.
6. What does the 2 mean on the lower bottom corner of a portrait?
-The small number you see on the bottom left of a portrait image is indicating that there are additional portrait images for that student. This can happen if the photographer supplies original and retake images. When you click on the student you will see the images on the left hand side of the screen. Click on the image that you want to use for that student and click save. From that point the image you selected will be used.
-Another reason you might see multiple images would be when two students have the exact same name and grade. In this situation our system will combine them together. You can then separate the images to make two separate student entries. See question number 3 for separating images.
7. How do I add a picture to a student that is missing an image?
When you click on a student that has a missing image you should see 3 options below the student info. You will see Upload Image, Use Public Upload and Use Clipart.
-The option to Upload Image will allow you to select an image from your computer to use for that student.
-The Use Public Upload option allows you to use images that have been uploaded using the Friesens app UploadIt.
-The Use Clipart option allows you to select a stock "No Photo" image or upload your own "No Photo" image to use for multiple missing images.
8. How do I move a student to the different grade?
To move a student to a different grade click on the student that you want to move. Then go to the grade info for that student and change it to the grade you want to move the student to. Once you click Save to that it will move the student to that grade. If you type in a grade that does not exist then the system will create that grade and put that student in it.
9. How do I delete an image or student?
In order to delete a student you first have to make sure that it is not flown on a page. If the image is flown on a page you won't be able to delete it. If the image is not flown on a page, hover your curser overtop of the portrait image and you should see a red delete icon. Click on this icon to delete the portrait image.
10. Can I restore or bring back an image I deleted?
Yes, if you have deleted a portrait image you can bring it back. Go to the Manage screen on the Portrait page of ConnectMe. In the list of grades you should see a deleted category. Go into that category and find the student that you want to restore. Hover your curser over the image and click on the green button. This will restore that portrait image to the grade it was deleted from.
11. I’d like to put a teachers job title in, but there’s no field to put it in?
In the flowing system you can add more information to different fields and flow them on the pages. First, you need to activate the group where you want to add this info. Below are the steps:
-Go to the portraits screen under Manage and you will see the option "Groups to Display". In that area check off one of the extra fields like Period, Teacher, Faculty, etc... (you only need one). Then click save.
-Click Edit beside the staff portraits. In that edit screen, click on one of the portrait images and you will the fields available for that portrait. You should see the extra field that you selected. In this field you can add additional information (job title, major, homeroom, etc...).
-After you add this information, you will need to select a flowing template (in the Design feature) that includes a two line option. Then you can set the first line to first name last name and then the second line can be the extra field that you have selected. This will flow that information with each portrait.
12. I’d like to see my grades by Homeroom, why can’t I see this?
-By default, the images will be sorted by the information that is in the Grade category. To change this go to the Portraits screen and click on Manage. In the settings area on the left hand side there will be an option to "Group By". Select the Homeroom option and click save. This will sort all the portrait images by homeroom.
NOTE: This will only work if you uploaded information into the Homeroom category.
13. Why do I get these exclamation marks showing after I flow for the names?
If you see exclamation mark attached to a portrait name box that means that the text in the box doesn't fit. The system will try to reduce the font size to fit the box if it can. If not then you may see this warning on the text box. To fix this, remove the flow of the images and then select a smaller font size for the names so that they fit. The second option would be to change the flowing template to include a second line for the names. That way the first name would be on the first line and the second line would be for the last name.
For other ways to correct this you can contact your project specialist at the plant.
14. Why after I flow the portraits do my portrait names look like a smaller size than other names?
This is simply because the size of font that was chosen is too large for that specific name. The system will automatically reduce the size of names that won't fit in the box provided.
15. Can I import my portrait settings from a previous year?
Currently, our system does not import the settings from a past year. However, you can contact your Project Specialist and they can help get that information for you.
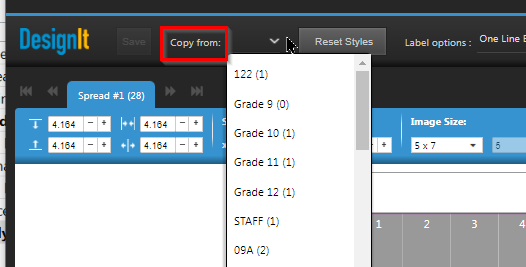
16. How do I copy settings from one grade to the next?
When you are setting up your portrait flow (in the Design screen), there is an option on the top left called "Copy From". Click on this menu and select the grade you want to use the settings from.
Was this article helpful?